In this blog post, we will discuss how to perform CRUD operations in Blazor using SQLite as a backend database in code first approach. We will create a Blazor Server application, and all the basic Create, Read, Update, and Delete operations will be performed via user interface interactions. If you are completely new to Blazor, I would request you to go through the Blazor introductory post here.
Blazor is a new framework provided by Microsoft to build interactive client-side web applications using C# programming language and Razor syntax on top of the .NET Core framework. The beauty of this framework is that the developer need not know any JavaScript and can leverage the existing .NET, .NET Core frameworks, and its associated NuGet packages to power the Blazor application. The developer can build a Blazor application that can run on the server or directly inside the client browsers.
- Prerequisites
- Demo Application Overview
- Implementing CRUD in Blazor using Sqlite as backend
- Create Blazor Server Application
- Add the NuGet Packages
- Add the following classes into Data directory
- Add using statements in _Imports.razor (Your namespace)
- Register the ProductDbContext and ProductService in the ConfigureServices() method of Startup.cs
- Add the user interface code and logic to index.razor file.
- Add CSS snippet into the site.css file.
- Add-Migration and Update-Database
- Execute the application
Prerequisites
In this blog post, we are going to create a Blazor Server Application using the default template provided by the Visual Studio 2019. The other tools and packages required are as follows:
- Visual Studio 2019 (v16.4) [download here]
- .NET Core SDK 3.1 [download here]
- SQLite Studio [download here]
Demo Application Overview
We are going to create a straight forward application, that reads all the records from the Product table inside a Products.db, SQLite database. These lists of products are displayed as an HTML table on the user interface.
An individual delete button is displayed in every row, clicking the same deletes the record from the Product table. Next to the table, a form is displayed to add a new product to the database table, and similarly, a form to update the product is also displayed using which the user can update an existing product. Now let us implement the CRUD operation in Blazor using SQLite as the backend.
Implementing CRUD in Blazor using Sqlite as backend
Create Blazor Server Application
The first steps are to create a Blazor Server Application, the small video given below shows how to create the same.
Add the NuGet Packages
The following NuGet packages are to be added to the project. If you don’t know how to add a NuGet package, you can check this link.
- Microsoft.EntityFrameworkCore.Sqlite
- Microsoft.EntityFrameworkCore.Tools
Add the following classes into Data directory
Product.cs: This is the product class that represent the Product Entity.
public class Product
{
    public int Id { get; set; }
    public string Name { get; set; }
    public double Price { get; set; }
    public string Description { get; set; }
    public int Quantity { get; set; }
}
ProductDbContext.cs: This is a DbContext class that help us to interact and perform database operations. The class also overrides the OnModelCreating() so that the database can have some seed data for testing purposes.
public class ProductDbContext : DbContext
{
    #region Contructor
    public ProductDbContext(DbContextOptions<ProductDbContext> options)
            : base(options)
    {

    }
    #endregion

    #region Public properties
    public DbSet<Product> Product { get; set; }
    #endregion

    #region Overidden methods
    protected override void OnModelCreating(ModelBuilder modelBuilder)
    {
        modelBuilder.Entity<Product>().HasData(GetProducts());
        base.OnModelCreating(modelBuilder);
    }
    #endregion


    #region Private methods
    private List<Product> GetProducts()
    {
        return new List<Product>
    {
        new Product { Id = 1001, Name = "Laptop", Price = 20.02, Quantity = 10, Description ="This is a best gaming laptop"},
        new Product { Id = 1002, Name = "Microsoft Office", Price = 20.99, Quantity = 50, Description ="This is a Office Application"},
        new Product { Id = 1003, Name = "Lazer Mouse", Price = 12.02, Quantity = 20, Description ="The mouse that works on all surface"},
        new Product { Id = 1004, Name = "USB Storage", Price = 5.00, Quantity = 20, Description ="To store 256GB of data"}
    };
    }
    #endregion
}
ProductServices.cs: This is the service class that uses the ProductDbContext class internally and provide 4 methods to create, read, update and delete products from the context.
public class ProductServices
{
    #region Private members
    private ProductDbContext dbContext;
    #endregion

    #region Constructor
    public ProductServices(ProductDbContext dbContext)
    {
        this.dbContext = dbContext;
    }
    #endregion

    #region Public methods
    /// <summary>
    /// This method returns the list of product
    /// </summary>
    /// <returns></returns>
    public async Task<List<Product>> GetProductAsync()
    {
        return await dbContext.Product.ToListAsync();
    }

    /// <summary>
    /// This method add a new product to the DbContext and saves it
    /// </summary>
    /// <param name="product"></param>
    /// <returns></returns>
    public async Task<Product> AddProductAsync(Product product)
    {
        try
        {
            dbContext.Product.Add(product);
            await dbContext.SaveChangesAsync();
        }
        catch (Exception)
        {
            throw;
        }
        return product;
    }

    /// <summary>
    /// This method update and existing product and saves the changes
    /// </summary>
    /// <param name="product"></param>
    /// <returns></returns>
    public async Task<Product> UpdateProductAsync(Product product)
    {
        try
        {
            var productExist = dbContext.Product.FirstOrDefault(p => p.Id == product.Id);
            if (productExist != null)
            {
                dbContext.Update(product);
                await dbContext.SaveChangesAsync();
            }
        }
        catch (Exception)
        {
            throw;
        }
        return product;
    }

    /// <summary>
    /// This method removes and existing product from the DbContext and saves it
    /// </summary>
    /// <param name="product"></param>
    /// <returns></returns>
    public async Task DeleteProductAsync(Product product)
    {
        try
        {
            dbContext.Product.Remove(product);
            await dbContext.SaveChangesAsync();
        }
        catch (Exception)
        {
            throw;
        }
    }
    #endregion
}
Add using statements in _Imports.razor (Your namespace)
@using blazorservercrudefsqlite.Data
Register the ProductDbContext and ProductService in the ConfigureServices() method of Startup.cs
While adding the ProductDbContext we are also providing the connection string which contains the name of the database i.e. Products.db
public void ConfigureServices(IServiceCollection services)
{
    services.AddRazorPages();
    services.AddServerSideBlazor();
    services.AddSingleton<WeatherForecastService>();

    services.AddDbContext<ProductDbContext>(options =>
    {
        options.UseSqlite("Data Source = Products.db");
    });

    services.AddScoped<ProductServices>();
}
Add the user interface code and logic to index.razor file.
The user can add a new product, update a product by selecting it from the table and can delete a product directly from the table.
@page "/"

@inject ProductServices service

<div class="container">

    <div class="row bg-light">
        <table class="table table-bordered">
            <thead class="thead-dark">
                <tr>
                    <th>Product Id</th>
                    <th>Name</th>
                    <th>Price</th>
                    <th>Quantity</th>
                    <th>Description</th>
                    <th>Delete Product</th>
                </tr>
            </thead>
            <tbody>
                @if (Products.Any())
                {
                    @foreach (var product in Products)
                    {
                        <tr @onclick="(() => SetProductForUpdate(product))">
                            <td>@product.Id</td>
                            <td>@product.Name</td>
                            <td>@product.Price</td>
                            <td>@product.Quantity</td>
                            <td>@product.Description</td>
                            <td><button class="btn btn-danger" @onclick="(() => DeleteProduct(product))">Delete</button></td>
                        </tr>
                    }
                }
                else
                {
                    <tr><td colspan="6"><strong>No products available</strong></td></tr>
                }
            </tbody>
        </table>
    </div>

    <div class="row m-5">
        <div class="col-5 bg-light m-2 justify-content-start">

            <div class="p-3 mb-3 bg-primary text-white text-center">Add New Product</div>

            <EditForm Model="@NewProduct">
                <div class="form-group">
                    <label for="name">Product Name</label>
                    <input type="text" id="name" class="form-control" @bind-value="@NewProduct.Name" />
                </div>

                <div class="form-group">
                    <label for="price">Price</label>
                    <input type="text" id="price" class="form-control" @bind="@NewProduct.Price" />
                </div>

                <div class="form-group">
                    <label for="quantity">Quantity</label>
                    <input type="text" id="quantity" class="form-control" @bind="@NewProduct.Quantity" />
                </div>

                <div class="form-group">
                    <label for="Description">Description</label>
                    <input type="text" id="Description" class="form-control" @bind="@NewProduct.Description" />
                </div>

                <div class="text-center p-3 mb-3">
                    <button class="btn btn-info" @onclick="AddNewProduct"> Add Product</button>
                </div>
            </EditForm>
        </div>

        <div class="col-5 bg-light m-2 justify-content-end">
            <div class="p-3 mb-1 bg-primary text-white text-center">Update Product</div>

            <EditForm Model="@UpdateProduct">
                <div class="form-group">
                    <label for="name">Product Name</label>
                    <input type="text" id="name" class="form-control" @bind-value="@UpdateProduct.Name" />
                </div>

                <div class="form-group">
                    <label for="price">Price</label>
                    <input type="text" id="price" class="form-control" @bind="@UpdateProduct.Price" />
                </div>

                <div class="form-group">
                    <label for="quantity">Quantity</label>
                    <input type="text" id="quantity" class="form-control" @bind="@UpdateProduct.Quantity" />
                </div>

                <div class="form-group">
                    <label for="Description">Description</label>
                    <input type="text" id="Description" class="form-control" @bind="@UpdateProduct.Description" />
                </div>

                <div class="text-center p-3 mb-3">
                    <button class="btn btn-info" @onclick="UpdateProductData"> Update Product</button>
                </div>
            </EditForm>
        </div>
    </div>
</div>

@code {

    List<Product> Products = new List<Product>();
    protected override async Task OnInitializedAsync()
    {
        await RefreshProducts();
    }

    private async Task RefreshProducts()
    {
        Products = await service.GetProductAsync();
    }

    public Product NewProduct { get; set; } = new Product();
    private async Task AddNewProduct()
    {
        await service.AddProductAsync(NewProduct);
        NewProduct = new Product();
        await RefreshProducts();
    }

    Product UpdateProduct = new Product();
    private void SetProductForUpdate(Product product)
    {
        UpdateProduct = product;
    }

    private async Task UpdateProductData()
    {
        await service.UpdateProductAsync(UpdateProduct);
        await RefreshProducts();
    }

    private async Task DeleteProduct(Product product)
    {
        await service.DeleteProductAsync(product);
        await RefreshProducts();
    }
}
Add CSS snippet into the site.css file.
This snippet will update the background of the table row whenever the mouse hovers over it.
 tr:hover {
        background-color:lightgray;
    }
Add-Migration and Update-Database
Open the Package Manager Console and execute the following two commands.
- Add-Migration “Initial-Commit”
- This command will create a migration folder into the project hierarchy and add a C# class file containing the migration details.
- Update-Database
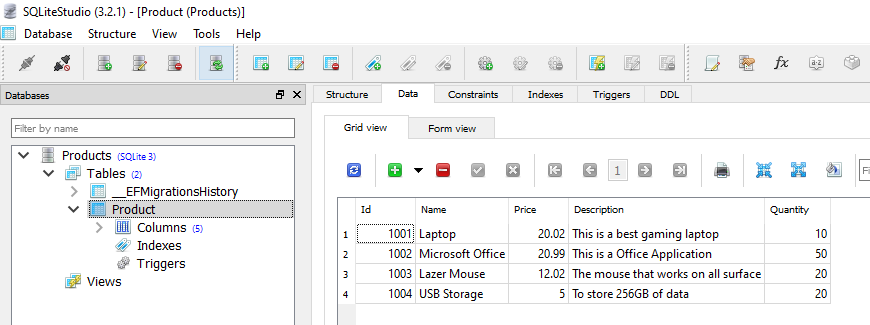
- This command will apply the “Initial-Commit” migration and create the database in the projects folder. If you check the database, the Product table will be having the 4 records which we declared in OnModelCreating() of the ProductDbContext class.

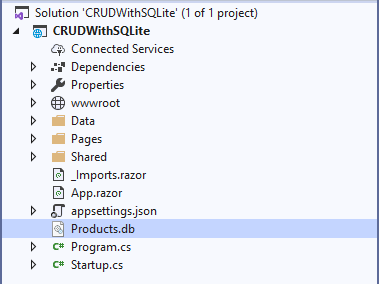
- The Products.db database will also be visible in the solution explorer.

Execute the application
Now as the implementation of CRUD operations in Blazor using SQLite as the backend is completed, let us execute the application (Ctrl+F5), and perform the operations using the UI, the SQLite database table must be updated accordingly. The same can be verified by checking the table data.
Source Code at GitHub: https://github.com/technicalbundle/blazorservercrudefsqlite
This concludes the post, I hope you find this post performing CRUD operations in Blazor using SQLite as the database helpful. Thanks for visiting, Cheers!!!.
[Further Readings: How to consume REST API in Blazor Application | Blazor Lifecycle Methods | A Simple way to Call Javascript in Blazor Application | Creational Design Patterns | Builder Design Pattern in C# | Prototype Design Pattern in C# | Top 5 Blazor Component Libraries | Abstract Factory Design Pattern in C# | Factory Method Pattern in C# | Singleton Design Pattern in C# | Introduction to Design Patterns | Microsoft C# Version History | Microsoft .NET Core Versions History | Microsoft .NET Framework Version History | Introduction to WPF in .NET Core | Useful Visual Studio 2019 extensions for database projects ]